Showing posts with label oracle. Show all posts

Thursday, November 3, 2016

How to schedule Business Rule to launch through the Planning Utility

Say you have to schedule a Business rule to run nightly in version 11.1.2.3.700

It being version 11.1.2.3, we have Calc Manager to handle the Business Rules - remember no EAS BRs.

In this version there is a utility - "CalcMgrCmdLineLauncher.cmd" in the Planning1 folder (D:\oracle\Middleware\user_projects\epmsystem2\Planning\planning1)

So, in order to run the Business Rules, we can go to the Planning1 folder and run "CalcMgrCmdLineLauncher.cmd /A:AppName /U:admin /D:DatabaseName /R:BusinessRuleName /Validate"
Validate if optional for validation.
In this case, we will be prompted for a password.
We can also use Password encripted file with "-f" syntax, which would look something like this
CalcMgrCmdLineLauncher.cmd -f:D:\oracle\Middleware\user_projects\epmsystem2\Planning\planning1\passwordFile /A:AppName /U:admin /D:DatabaseName /R:BusinessRuleName

This script can be scheduled by including the lines in a batch script.
Create a batch file and include the lines ---
call D:\oracle\Middleware\user_projects\epmsystem2\Planning\planning1\CalcMgrCmdLineLauncher.cmd -f:D:\oracle\Middleware\user_projects\epmsystem2\Planning\planning1\passwordFile /A:AppName /U:admin /D:DatabaseName /R:BusinessRuleName

Friday, March 8, 2013

TNS:could not resolve the connect identifier specified – ORA 12154


I was trying to load some data and each time I ran the SQL script, I got the message “ORA 12154 TNS:could not resolve the connect identifier specified.” Since, I am not on the Oracle side but rather on the Hyperion side, some research regarding “TNS names” and the “ORA 12154” error helped me solve the problem. The reason I am entering this on my blog is because it might be helpful to folks who come across the same issue.

The above error can be seen for various reasons as per documents:

                a. Oracle net libraries not being able to get the TNS alias from “TNSNAMES.ORA” file.
                b. Something is wrong with the way the alias is created in the “TNSNAMES.ORA” file, such as   incorrect syntax.
                c. TNS alias could not be resolved into a connect adapter.

There are several things we need to check and make sure they are correct.

1. Verify that the TNSNAMES.ORA file has the "service name" and "alias" that are being used. In my case, the path to the file is \\SERVER\D$\oracle\database\product\11.2.0\client_1\network\admin

2. Take a look at a file SQLNET.ORA in \\SERVER\D$\oracle\database\product\11.2.0\client_1\network\admin folder and make sure that you have TNSNAMES in NAMES.DIRECTORY_PATH.

For example:

NAMES.DIRECTORY_PATH= (TNSNAMES, EZCONNECT)

3. Try and see if  you can log in to Oracle using SQL developer, SQL PLUS or any other tool that you use in your environment.

4. Ensure that the ENVIRONMENT VARIABLE "PATH" has the path for the TNSNAMES.ORA file specified.

If you are not sure how to check the ENVIRONMENT VARIABLE "PATH", - in Windows XP
a. Start -> My Computer -> Right Click -> Properties.
b. Click the ADVANCE tab and then ENVIRONMENT VARIABLES
c. Under "SYSTEM VARIABLES" you will see a bunch of "varialbes" and "values" They should be in alphabetical order. Key in "P" to get to the variables starting with "P"
d. When you get the "PATH" click the EDIT tab.
e. You will see a lot of paths here. The easiest way to view is to copy and paste it to a word processor such as Notepad or Textpad, whatever you prefer or have.
f. Check and see if the path to TNSNAMES.ORA is specified here.
g. Also ensure that you have the path for Oracle_Home specified.
h. One thing very tricky about the PATH that I have noticed is that even when you have the path specified, it does not work. In that case, if your variable path is towards the end of the path, try to move it towards the beginning. I am not sure if it is a glitch or if there is restriction in the number of letters, but I have noticed quite a few times when it worked by moving the path towards the beginning.
i. Another interesting and sometimes confusing issue is that sometimes we happen to have the Client installed more than once and the path points to the wrong one. This is also sometimes an issue. So make sure that you have the path of the right one.
j. Check the registry for Oracle_Home (the value). If you are not sure how to check it.
          a. Start command prompt. START -> RUN -> Type in "REGEDIT" and hit enter. You will see the REGISTRY EDITOR screen.
          b. On the left pane -> HKEY_LOCAL_MACHINE \SOFTWARE\ORACLE\Key_OraClient11g_home1. On the right pane, you will see the path. Ensure they are correct.
k. Check entry for TNS_ADMIN in the registry editor: HKEY_LOCAL_MACHINE \SOFTWARE\ORACLE. If it is there make sure it has the right path: ...client1\network\admin. If it is not there, create one.
i. If you think you have more than one instance of Oracle client, you can check if there are more in the registry editor: HKEY_LOCAL_MACHINE\SOFTWARE\ORACLE\ALL_HOMES\HOME_COUNTER.

After ensuring all of the things specified above are correct try to run the SQL script, it should work unless there are some other issues with the system.


Thursday, February 14, 2013

How to create data source in WebLogic


This a tutorial about how to create a WebLogic Data Source.
1.      Log in to WebLogic Admin console.
2.      Click “Lock & Edit” in the left pane.
3.      Under “DOMAIN STRUCTURE” on the left, Drill down and click “Services -> Data Sources”

4.      On the right, click “NEW” (it has a drop-down arrow) -> “GENERIC DATA SOURCE” 
5.      There are three things to be filled out in the next screen - Name, JNDI Name, and Database Type. Fill them out as per your requirement and click NEXT.
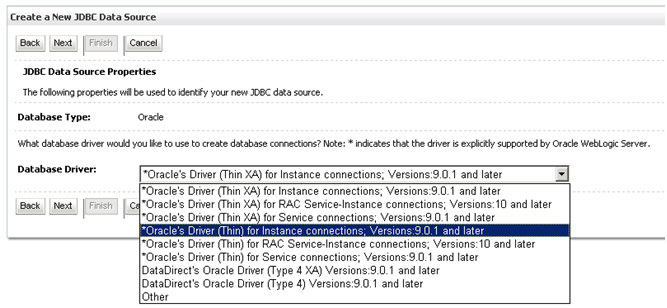
6.      For Database Drive, choose the one as per requirement. In my case, I have chosen “Oracle’s Driver (Thin) for Instance Connection.” Click Next. 

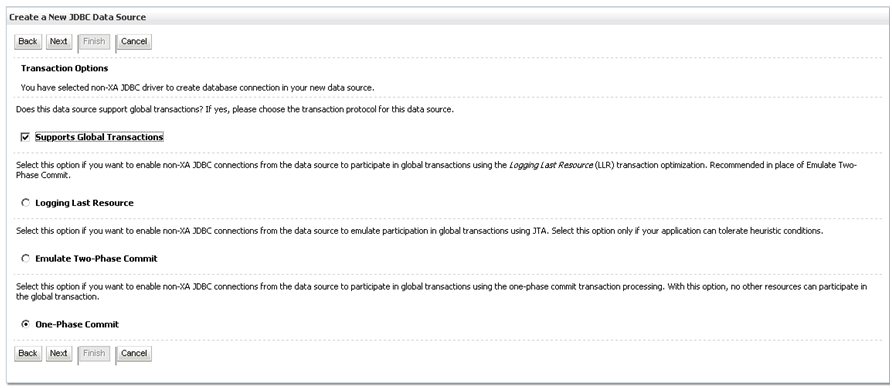
7.      For the “Transaction Options” look at Oracle’s documentation regarding Transactions. It depends on the company’s requirements. Leave default in this case. Click NEXT. 
8.      On the screen that follows, enter the DATABASE NAME, HOST NAME, PORT, DATABASE USER NAME, and PASSWORD. Click NEXT.
9.      We will get the following “TEST DATABASE CONNECTION” screen where we can test the configuration. 

10.  Click “TEST CONFIGURATION” to test. If it passes, it will show a green check mark. 
11.  Click FINISH.  


Monday, February 11, 2013

How to start Oracle WebLogic

This is a tutorial regarding how to start Oracle WebLogic. WebLogic installation/configuration is automatic during EPM version 11 installation configuration, and we do not need to do much about it. However, knowing how to Launch WebLogic application comes in handy at times.

In order to start WebLogic, we need to first:
1.       Start WebLogic Server
2.       Launch the Administration Console
Starting WebLogic Server
  1. 1        Start COMMAND PROMPT
  2. 2.       Navigate to the domain directory, BEA_HOME/user_projects/domain_name (in my case, for example, the path is D:/Oracle/Middleware/User_projects/domains/EPMSystem1)
  3. 3.       Run the startup script – startWeblogic.cmd
  4. 4.       The startup script displays a series of messages. Finally we will see a message that looks something like this:   

   <Feb 11, 2013 9:50:42 AM EST> <Notice> <WebLogicServer> <000360> <Server started in RUNNING mode>
  1. 5.       After the server has started, we can start the WebLogic Administration Console

Launching the Administration Console
  1. 1.       Open up a web browser, Internet Explorer, for example.
  2. 2.       Type in the WebLogic URL: http://hostname:portname/console (for example, if my hostname is normal the URL would be http://normal:7001/console) and hit enter.
  3. 3.       The WebLogic login page opens up. 
  4. 4.       Type in the username and password
  5. 5.       Now w are in WebLogic.

      The default ports for WebLogic server are: 7001 and 7002 for HTTP and HTTPS respectively.