Thursday, December 27, 2012

Hyperion Planning Maintenance Mode – How to


In Hyperion Planning, read-only mode is very useful especially when we are doing some changes in the Planning hierarchy or outline, and it is also useful while we are doing data loads. Since we don’t want users to get into the system during these activities, we can set planning applications to maintenance mode so that the application users and planners are locked out of application.

The steps in taking Planning to maintenance mode:

Log on to Planning Workspace.

Open up an application.

On the Menu bar, choose ADMINISTRATION ->  APPLICATION -> SETTING


We will see the following screen.


Under Application Maintenance Mode -> Enable Use of the Application for: Choose Administrators and SAVE. This will take the Planning application to maintenance mode and it will not be available to any users below the rank of the administrators.

ExportSecurity ImportSecurity in the Hyperion Environment

Nikon Coolpix L810 16MP 26X Optical Zoom Black Digital Camera (Google Affiliate Ad)

In Hyperion Planning ExportSecurity and ImportSecurity are two very important utilities that can be used to give access to users.

They reside in the bin folder, therefore, in terms of Hyperion 11.1.2, it should be somewhere around D:\Oracle\Middleware\user_projects\epmsystem1\planning\planning1 (this is the regular path and one that we have in our environment, it may be a little different depending on how it is installed in your work environment). 

ExportSecurity exports the security features and creates a SECFILE.TXT file inside the BIN folder and ImportSecurity imports the security that is present in the SECFILE.TXT file to the specified application. For example, if you have a user called SAM whose access you want to export and import to user HARRY, then you need to use the ExportSecurity command with SAM and then use the ImportSecurity with user HARRY.

Please look at the syntax below. 

In order to run the command, please open the COMMAND PROMPT and go to the BIN folder.

ExportSecurity.cmd /A=applicationname, /U=adminusername, /S_USER=SAM

The above command creates a SECFILE.TXT inside the BIN folder. What you need to do here is open the file, change the username from SAM to HARRY, and save the file. 

If you want to export an application's overall security file, the syntax would be:

ExportSecurity.cmd /A=applicationname, /U=adminusername

This command exports the application overall security file and output a secfile.txt.

A batch script is of great significance if you have a lot of applications.
In my case, I have a batch file which I have named "KHOONKSSEC.BAT"
______________
REM Export security for the KHOONKS planning application


CALL D:\oracle\Middleware\user_projects\epmsystem1\Planning\planning1\ExportSecurity.cmd /A=KHOONKS,/U=ADMIN

We can specify the output file name/location by using the parameter "TO_FILE"
In the following example,
username is nirmal, application is khoonks, and we would like to export the resulting security file to a file named "mysec.txt" in E:\my_folder.
So the syntax would be something like:
ExportSecurity.cmd /A=khoonks,/U=nirmal,/TO_FILE=E:\\my_folder\\mysec


Moreover, we can also use the (-f) option to encrypt the password while doing the security export. In this case the syntax of a batch script to call the ExportSecurity.cmd would look something like:

call D:\oracle\Middleware\user_projects\epmsystem1\Planning\planning1\ExportSecurity.cmd -f:D:\oracle\Middleware\user_projects\epmsystem1\Planning\planning1\passwordFile /A=appname,/U=ADMIN,/TO_FILE=E:\\samplefolder\\subfolder\\mysec_secfile

The above script will create a file called mysec_secfile.txt inside the "subfolder" folder in the specified path. 

NOTE: In the above example, there is a space before "-f" and after "passwordFile"
The utility is very sensitive in terms of case and spaces. Therefore, make sure they are correct. 
_________________

Now that I have a batch file, I do not have to go to the BIN folder and type the syntax each time I want to export security, I can simply run the Batch file. Now you can enter the ImportSecurity command.

ImportSecurity.cmd “appname, username, password”

Security can be removed from Planning application by running the following ImportSecurity command -
ImportSecurity.cmd "MYAPP,ADMIN,,,,SL_CLEARALL"  - where MYAPP is the name of the application and ADMIN is the username. 
NOTE - make sure to have the four "commas" 


Wednesday, December 26, 2012

Hyperion Business Rules Migration

Hyperion Business Rules Migration can be tricky. Even though, the Life Cycle Management (LCM) is considered the official migration tool in the EPM environment, migration of Business Rules has been an exception as far as version 11.1.2.1 is concerned.

However, Hyperion Business Rules can be migrated from one environment to another using the Essbase Administration Services (EAS) console. These are the steps you can follow in order to migrate Hyperion Business rules.

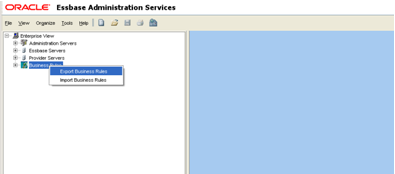
Log in to Essbase Administration Console (in the source environment)

In the Navigation window on the left, right-click Business Rules -> Export Business Rules.


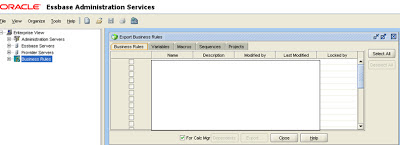
Select the Business Rules that you want to export in this step. If exporting all the business rules, Select ALL.


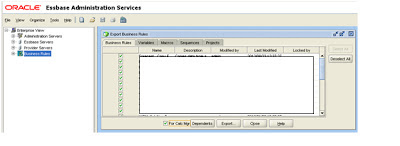
After selecting the Business Rules, the DEPENDANTS tab becomes active. Click the Dependants tab if you want to export the dependants. In case it is the Calculation Manager Environment, check the "FOR CALC MGR" check box. Make sure the Variables are checked too as they need to be migrated as well. 


Click Export and you will be prompted for a file name and location where you can save the file. Business rules that we export are saved as .XML file.


So far, we have exported Business Rules from the target environment. Now we need to move the XML file that we have just created (saved during Business Rule export) to a folder of choice in the target environment.

If you are using EAS desktop or Web client from your workstation, you can simply save the exported XML file in your computer. Make sure you follow specific file naming convention to ensure what you are doing.

Important
One very important thing that we need to remember at this point of Business Rules Migration is that the exported XML file contains hard-coded names that point to the source environment. For example, if your target environment server name is KHOONKS, you will find this name hard-coded in the XML file. So, before you start importing the XML in the target environment, open the XML file with an editor and replace all the instances or names that point to the source with the ones that you have for target. It is a very important point. 

After you are sure that you have nothing pointing to the source environment, you can log on to EAS in the target environment. 

On the left in the navigation window, right-click Business Rules -> Import Business Rules


Here we will get the prompt to choose the XML file that we can import to the target environment. We can choose the name of the BR file and then hit OPEN.


On the next screen, we can hit OK to import the Business Rules.


Essbase Hierarchy

Essbase, being a multidimensional OLAP tool, hierarchy is of utmost importance as aggregation in Essbase depends on its hierarchical structure. 
Under each dimension in Essbase, we see other members to branch out which further branch out to several others.
For example:
Year
      Qtr1
              Jan
              Feb
              Mar
      Qtr2
              Apr
              May
              Jun                     etc.

We can view Essbase hierarchy from three points of views: Genealogy, Generation, Level.

1. Genealogy: From this point of view, the member at the top most level is the ancestor of the one below it. In this example, Year is the ancestor of Jan, Feb. Jan is the descendant of Year. Year is the parent of Qtr1 and Qtr2, and Qtr1 and Qtr2 are the children of Year. Jan, Feb, and March are siblings. 

2. Generation: We also use G1, G2, G3, etc for generation reference. The member at the top is Generation1, so in this case, Year is G1 or generation1, followed by Qtr1 and Qtr2 being G2, and Jan to Jun being G3. So, G starts from 1 and increases as we drill down towards lower members in the hierarchy.

Level: Level reference works opposite to Generation reference and it starts with the number 0. This means the members at the lowest level in the hierarchy is Level 0 and the level increases as we go higher. In this example, Jan, Feb, Mar, etc are the bottom-level members, so they are Level 0 members. Qtr1 and Qtr2, in this example, are Level 1 members and Year Level 2. The bottom-level members are also referred to as leaf members.


Hyperion Life Cycle Management: A migration tool

Life Cycle Management is a tool that comes loaded with Hyperion Shared Services which can be used to migrate Oracle EPM applications and artifacts from one environment to another.

During the migration using Life Cycle Management (LCM) tool in Hyperion Shared Services, first we export the applications and artifacts from the source environment and then we import them in to the target environment, therefore, we will first perform LCM export.

LCM EXPORT IN SOURCE ENVIRONMENT

While exporting, you could follow any order in terms of application-artifact export, however, I would recommend exporting in the following sequence.
  1. Foundation/Shared Services
    1. Source option: leave default
    2. Destination: File System            example: SS_EXPORT_CONTENT
  2. Planning/Application name
    1. Destination: File System            example: PLAN_EXPORT_CONTENT
  3. Foundation/Calculation Manger (not available in our environment)
    1. Destination: File System            example: CALC_EXPORT_CONTENT
  4. EssbaseCluster1/EssbaseCluster1
    1. Destination: File System            example: ESSBASE_EXPORT_CONTENT
  5. Report and Analysis/Report and Analysis
    1. Source Option     UNCHECK "export with job output"
    2. Destination: File System            example: RA_EXPORT_CONTENT

 Here are the steps.

  1. Log in to Hyperion Shared Services.
  2. Under Application Management, expand Application Groups -> Foundation -> Shared Services and double-click Shared Services.
  3. Under the Artifact List on the right, expand the Native Directory and choose the artifacts that you want to export. In this case, we can select Groups, Users, EssbaseCluster1, Planning
  4. On the left pane, under Application Management, expand Foundation -> Calculation Manager. 
  5. On the right, expand Planning and choose the application and artifacts to be exported.
  6. Now under Application Management on the left, choose Planning -> Application name (FinSrv in this example). You will see the artifact lists, such as Configuration, Global Artifacts, Plan Type, Relational Data, Security, etc. Select ALL.
  7. Under Application Management -> Application Groups, choose EssbaseCluster-1 and double click EssbaseCluster-1 under it. On the right, under Artifact list, Select ALL.
  8. Add caption
  9. Reporting and Analysis under Application Management -> Reporting and Analysis.
  10. On the right, under Artifact List, expand Repository Objects and choose the ones to be exported. Then expand Security, and select the ones to be exported or select all depending on requirement. Remember to cross check Product Preferences as well. The figure below has everything selected under Repository Objects and Security and since everything could not fit, I have not expanded them. However, if you click the PLUS right before the objects, you will see all the artifacts.
  11. Click on DEFINE MIGRATION to start the migration process, and this (following screenshot) is what we will get – the source screen for initiation of migration process. Choose Foundation/Shared Services and click NEXT.
  12. On the source screen, like in the following screen, leave the defaults and click NEXT.
  13. On the destination screen, give a file name under File System. Your Shared Services artifacts, etc will be exported under this folder/file. Click NEXT.
  14. On the Destination options screen, leave the default and click NEXT.
  15. We will see the following screen. We can see a green CHECKMARK on the left to Foundation/Shared Services, which means that we have chosen the artifacts under Shared Services that we want to migrate. Lets now go on to Planning by checking the RADIO BUTTON that is to the left of Planning/FinSrv.
  16. Click NEXT to start the Migration wizard.
  17. Leave the Source Option as default and click NEXT.
  18. In the Destination screen, give a file name PLAN_EXPORT_CONTENT under the file system.
  19. Leave Defaults on the Destination Options screen and click NEXT.
  20. Like in the following screen, choose Foundation/Calculation Manager and click NEXT to start the migration wizard. There are green check marks before Planning/FinSrv as well.
  21. On the source options screen, leave the defaults and click NEXT.
  22. On the destination options screen, under the file system, give a name CALC_EXPORT_CONTENT and click NEXT.
  23. Leave the defaults on the Destination options screen and click NEXT.
  24. Now lets start the EssbaseCluster-1 migration process. Choose EssbaseCluster-1/EssbaseCluster-1 in the source screen and hit NEXT.
  25. Leave the defaults on the source options screen, and under the Destination screen, enter a file system file name called ESSBASE_EXPORT_CONTENT.
  26. Leave default on the Destination Option screen.
  27. For Reporting and Analysis migration, choose the radio button on the left of Reporting and Analysis/Reporting and Analysis and click NEXT.
  28. On the source options screen, uncheck "EXPORT WITH JOB OUTPUT" and click NEXT.
  29. Under Destination screen, enter a file name called RA_EXPORT_CONTENT. Leave defaults under the Destination Options screen.
  30. On the Summary Screen, click EXECUTE MIGRATION to execute migration.
  31. Click LAUNCH MIGRATION STATUS REPORT in order to view the migration status. Migration STATUS REPORT can also be opened from the menu bar by clicking on Administration -> Migration Status Report.
  32. We will see a report page which shows a list of artifacts/ applications that we have migrated from the past in a chronological order.
  33. If the status is "IN PROGRESS" it means the migration is in progress. You can click REFRESH at the bottom right. If the migration completes successfully, the status will show COMPLETED. If migration fails due to any reason, we will see FAILED status. If the status is FAILED, we can click on it to get the report as to why the migration failed, like in the following screenshot.


FOOD FOR THOUGHT

In order to import the artifacts/applications in the target environment, we will make use of the applications/artifacts that we just exported in the above steps.

Since we have exported the artifacts and application in the FILE SYSTEM, they will be saved under the IMPORT_EXPORT folder in the middleware home. So if we want to see where they are in the source environment, we can go to the Middleware home. The path would be something like D:\Oracle\Middleware\User_projects\epmsystem1\import_export.

Lets look at the contents under import_export folder and we will see folders such as admin@native_directory, etc. The files that we saved during migration will be found here. For example, while doing the Shared Services migration, we had entered a name SS_EXPORT_CONTENT under the file system. So, the file will be available in this folder.

Copy these folders (the exported ones) and paste it in the same folder in the target environment and then we will go ahead with the LCM import process in the target environment.


LCM IMPORT IN TARGET ENVIRONMENT


The steps:


  1. Log in to Shared Services.
  2. In Shared Services, under Application Management, expand File System. Select CALC_EXPORT. On the right pane with Artifact Lists, Select ALL.
  3. One by one, select all the artifacts/applications (that we have exported earlier) on the left and Select ALL on the right.
  4. Now click the SELECTED ARTIFACTS tab and you will see a screen similar to the following:
  5. Click the DEFINE MIGRATION tab to start the import migration process.
  6. On the source screen, select the Shared Services source (File System\SS_EXPORT) and click NEXT.
  7. Leave the defaults on the Source Options screen.
  8. Leave defaults on the Destination screen as well as the Destination Options screen. Click Next and then it will go back to the source screen again where we will choose the GlobalSubstitutionVariables, as in the following screen.
  9. On the source option, destination (EssbaseCluster-1:EssbaseCluster-1), and destination options screens, leave the defaults. Click Next.
  10. On the source screen, choose the Planning Application File System (File System\PLAN_EXPORT).
  11. On source options, leave the defaults.
  12. On the destination screen, select the application that you want to migrate to. For example, if you want to migrate to the application called SAMPLE, you can choose SAMPLE in this case.
  13. On the destination options screen, leave the defaults. Click next and it will take you again to the Source screen.
  14. Select File System\RA_EXPORT and click NEXT.
  15. Source screen, destination screen (Reporting and Analysis: Reporting and Analysis), and destination options screen should have defaults. Click Next to return to source screen again.
  16. On the source screen, select the File System Calculation Manager artifacts (File System\CALC_EXPORT). Click NEXT.
  17. Source options should be left default and also the destination (Foundation: Calculation Manager) and destination option screens. Click NEXT.
  18. Click EXECUTE MIGRATION in the Summary Screen to execute the migration process.
  19. If you want to save the migration definition as a file, you can do so by clicking the SAVE MIGRATION DEFINITION tab. It will create an .XML file in the location of your choice.
  20. After the migration is executed, we can check the status in the Migration Status Reoport.


Foundation/Shared Services
Summary screen before executing migration.
Need to click on EXECUTE MIGRATION tab in order to perform migration. The SAVE MIGRATION DEFINITION saves the file in the location of choice.


DataLoad after migration
After successfully exporting application/artifacts from source environment and importing them in the target, we can load data to the Essbase cube.