Friday, June 16, 2017

Hyperion Planning Financial Report - a user Point of View tip

In Oracle's Hyperion Planning world, we can create Financial reports by choosing either Essbase or Planning as the data source. They have their own shares in term of advantages and disadvantages.

Reports with Essbase as the data source can pull larger number of records, and therefore, we can create huge reports. On the other hand, we are not able to view supporting details in such reports which can sometimes be a disadvantage.

On the other hand, if we create a report with Planning as the data source, we will have the option to view supporting details as well. However, it comes with a price. Such reports will be limited to specified number of cells in Planning (ERROR_THRESHOLD_NUM_OF_CELLS), meaning a report that would generate more than he cells specified would throw an error. Moreover, there is another significant issue that would annoy users trying to pull Financial reports build off Planning data source. This issue affects non-admin users where they see the entire hierarchy while using the POV in pulling a report.
Admin users are perfectly fine with this issue because they see exactly the members as defined in the report, however, non-admin users could get annoyed as they need to drill down the whole hierarchy.

We can take the following steps to at least restrict the users to the level he is assigned to -

Option one is to set preferences manually one user at a time. If we are to follow this option, we can ask the user to do the following:
1. Go to File - > Preferences.
2. Click the "Financial Reporting" tab.
3. Click the "Setup Members" tab under "User Point of View."
4. For "Database connection", click the drop down, and choose the Planning connection that the report is against and hit Refresh.
5. All the way at the bottom of the dialog, for "Member Selection Display" choose "Only members I can access" and click OK to exit out the box.

Now the user should see only up to the level he is assigned access to in Planning, and not the whole tree.

Option two is setting the property up globally by the ADMIN by using the FRCONFIG.CMD

In order to do so,
1. Go to D:\oracle\Middleware\EPMSystem11R1\products\financialreporting\bin and run FRCONFIG.CMD. It opens the Java Monitoring & Management Console.
2. Click the MBeans tab.
3. Expand com.hyperion -> Financial Reporting -> Attributes -> and click "com.hyperion.reporting.HRPrefs.filter_by_security"
4. On the right-hand side of the box, under Attribute value, set the value to "true" and Refresh.
5. Exit the Java console.
6. Restart Reporting and Analysis.

By taking the steps as outline above, we can prevent the users from having to see the whole tree, however, it does not resolve the issue completely, because, the users may still see members that are outside the scope of the report.

As I communicated with Oracle and looked through documents, the issue seems to have been resolved in version 11.1.2.4, however, I have not tested version 11.1.2.4 yet.


NOTE - It is based on EPM 11.1.2.3.700

Wednesday, June 14, 2017

How to set Hyperion Financial Report default user point of view On


When a new user is assigned access to Hyperion Workspace, the Financial report user Point of view is set by default to "Off."

In this scenario, the user needs to set the POV manually by going to File -> Preferences -> Financial Reporting. This can, however, be avoided by setting the POV to on globally by the admin.

It can be achieved by following the steps as outlined below -

1. Run the FR Configurator (FRConfig.cmd in Windows, FRConfig.sh in UNIX) under oracle\Middleware\EPMSystem11R1\products\financialreporting\bin.
2. Go to the MBeans tab.
3. Expand com.hyperion -> Financial Reporting -> Attributes.
4. Set the value for "com.hyperion.reporting.HRPrefs.previewuserpov" to "true".
5. Close the Configurator.
6. Stop and restart the Financial Reporting services.
7. In order to verify the result, create a new user and ask the user to sign in to Workspace.
8. Ask the user to go to File > Preferences > Financial Reporting.

The "Preview User Point of View" should be "ON" now.

Friday, January 6, 2017

Cannot drop a user that is currently connected - How to drop it

The reason I have this post here in the Hyperion blog is because of the close connection between the EPM environment and the DBA world - coz at times you have to act as an EPM admin as well as a database admin.

Say for example you want to drop/re-create an Oracle user.

Basically the query that you would write would be something like this:

DROP USER NIRMAL CASCADE;

The above syntax does the job of dropping the user "NIRMAL," however, if the user is connected somehow, you will get the error message "cannot drop a user that is currrently connected....."
It implies that one or more session is open for the user, and we need to kill the session before we can drop the user.
The first step is finding the session -

SYNTAX
SELECT SID,SERIAL# FROM V$SESSION WHERE USERNAME = 'NIRMAL'
The output will have the SID and SERIAL#s listed.

Now that we know the SID and SERIAL#s
SYNTAX
alter system kill session '34,4177';  ... etc(whatever the SID/SERIAL# combination)

The above SQL kills the session and disconnects the user.
Now all we need too do is run the DROP USER query again.

DROP USER NIRMAL CASCADE;

ALTERNATE WAY

SYNTAX
SELECT 'ALTER SYSTEM KILL SESSION ''' || SID || ',' || SERIAL# || ''';' FROM V$SESSION WHERE USERNAME = 'NIRMAL';
returns
one KILL statement per session for user 'NIRMAL'


Run the KILL statement and DROP the user.


Thursday, November 3, 2016

How to schedule Business Rule to launch through the Planning Utility

Say you have to schedule a Business rule to run nightly in version 11.1.2.3.700

It being version 11.1.2.3, we have Calc Manager to handle the Business Rules - remember no EAS BRs.

In this version there is a utility - "CalcMgrCmdLineLauncher.cmd" in the Planning1 folder (D:\oracle\Middleware\user_projects\epmsystem2\Planning\planning1)

So, in order to run the Business Rules, we can go to the Planning1 folder and run "CalcMgrCmdLineLauncher.cmd /A:AppName /U:admin /D:DatabaseName /R:BusinessRuleName /Validate"
Validate if optional for validation.
In this case, we will be prompted for a password.
We can also use Password encripted file with "-f" syntax, which would look something like this
CalcMgrCmdLineLauncher.cmd -f:D:\oracle\Middleware\user_projects\epmsystem2\Planning\planning1\passwordFile /A:AppName /U:admin /D:DatabaseName /R:BusinessRuleName

This script can be scheduled by including the lines in a batch script.
Create a batch file and include the lines ---
call D:\oracle\Middleware\user_projects\epmsystem2\Planning\planning1\CalcMgrCmdLineLauncher.cmd -f:D:\oracle\Middleware\user_projects\epmsystem2\Planning\planning1\passwordFile /A:AppName /U:admin /D:DatabaseName /R:BusinessRuleName

Thursday, September 22, 2016

Oracle Smart View 101 - Smart View Error (503)

Say for example you are running a large query via Oracle Smart View and you get an error:
"Cannot connect to the provider. Make sure it is running in the specified host/port. Error (503)."

CAUSE -
The cause of this issue is that the time to complete the query in Smart View exceeds specified maximum session timeout value.

When this error occurs, user must close MS Excel and then re-open and re-login to continue working.


SOLUTION -

In order to resolve the issue, we need to modify the session timeout setting, which is specified in "mod_wl_ohs.conf" in the Weblogic Managed server. In the specified file, modify the parameters for WLIOTimeoutSecs and WLSocketTimeoutSecs or add the lines if missing. 
Also make sure to restart the Oracle HTTP Server (OHS) and the WebLogic managed server for the Analytic Provider Services (APS) server for the new setting to take effect.

Take the following steps:
1. Shutdown Essbase services/processes.
2. Back up current mod_wl_ohs.conf file, which is found in the Windows environment in D:\Oracle\Middleware\user_projects\epmsystem\httpConfig\ohs\config\OHS\ohs_component folder.
3. Open mod_wl_ohs.conf file in a text editor and add or modify the parameters for the        “WLIOTimeoutSecs” and “WLSocketTimeoutSecs” properties within the location section for APS.
Here is a sample:
<Location Match ^/aps>
SetHandler weblogic-handler
WeblogicCluster <aps-server-name>:13080
WLIOTimeoutSecs 1800
WLSocketTimeoutSecs 1800

</LocationMatch>

4. Restart Oracle HTTP Server and WebLogic managed server services. 


Friday, February 5, 2016

EPM patch 11.1.2.3.700 - this is how I applied them.

The EPM patch 11.1.2.3.700 resolves several issues that we see in previous versions of the 11.1.2.3 patches. For example, we were in 11.1.2.3.500, and two of the major issues were:

a. IE 11 Enterprise mode- In order to log in to Workspace in version 11.1.2.3.500, IE 11 has to be set to Enterprise mode. It does not work in regular IE 11. 
b. Accessing Workspace reports (R&A) via SmartView throws error.

There might be other issues as well, however, the ones mentioned above were the ones that were the main issues. 
My environment: Windows Server 2008 R2. Oracle DB 11G, EPM 11.1.2.3.500, IE 11.

Following are the patches that I applied in order to upgrade to version 11.1.2.3.700. Well Oracle has a list of the patches, however, a list and sequence always helps.

NOTE:
The two first patches to be applied are:
1. Shared Services patch 20675028
2. Workspace patch 20612400 (Pre-requisite patch - 17529887 )

After applying these patches, the other patches could be applied in any sequence. However, make sure to go over the READ ME and make sure the pre-requisites are met. In my case, I went through the following path:

Financial Reporting Patch 20838970   
Reporting And Analysis Framework patch 20768325
Web Analysis patch 20880421
Planning patch 20643564
Calculation Manager patch 21292109
ADF patch 21240419 

NOTE ** ADF patch has a slightly different syntax as compared to the other patches. Check the READ ME. sample ADF patch syntax --- 

D:\oracle\Middleware\EPMSystem11R1\OPatch\21240419\oui -oh D:\oracle\Middleware\oracle_common -jre D:\oracle\Middleware\jdk160_35


Patches, sometimes, are intimidating, especially in the case of applying patch 500 or patch 700. Moreover, every environment could be different. Also in the processing of applying the set of patches, there are so many times we need to uninstall or reinstall or reconfigure certain products while also deleting some folders, such as TMP, cache, etc. Therefore, it is always recommended to go through the READ ME very carefully and also backup the system before taking any step or applying each patch.

Happy patching. 

Acknowlegements
Two entities I would like to thank for some suggestions - Oracle Support and John Goodwin

Tuesday, December 22, 2015

How to run a batch script from Workspace

In order to run a batch job through Workspace, we can take the following steps:

In this example, I am going over the steps in creating a job which when runs the ExportSecurity batch job (that I have created for a specific application) from the Workspace.


The “Generic Job Application” tab opens.
Right-click anywhere and choose “Create New Generic Application” OR click the “+” sign.
The following “Create New Generic Application” window pops up.


Provide a suitable “Product Name” like in the following screenshot. In my example, I have given a name “Export_Security_From_Workspace”
Choose a Product Host, which is the Server where Workspace is Configured.
We can “Click a button to insert a Command Template value.” In this case (it being a Windows batch job), we can select “$PROGRAM” and “$PARAMS” – Note: Please refer to “Reporting and Analysis Frameword Admin guide” for more information on this.
For the Executable we can specify the “CMD.EXE” file - %WINDIR%\System32\cmd.exe


Click OK

Now the steps to import the batch file.
In this example, I am in the “Testing” folder in Workspace.
Import “File As a job”


The following windows pops up.


Provide the file, a name and description (optional), and check “Import as Generic Job” like in the following screenshot.


Click Next. The following screen pops up. Choose the job we created in the beginning of the tutorial.


Based on requirement or the work environment, we can choose “Run Options” “Parameters” “Credentials” etc. However, it can be finished at this point by clicking the “Finish” tab.
Now, we can see the job in the folder “Testing” in the Workspace.


We can now run the job by double-clicking or by right-clicking.


The following windows appears where we can specify the output.


Click “Run”


When the job completes, we can see the security file being populated.


Check the “Testing” folder again and we now have the OUTFILE as well where resides the “SECFILE.TXT” 

Wednesday, August 12, 2015

Accessing the Hyperion Workspace Explore folder

When it comes to browsing through the folders in Hyperion Workspace, we have the Explore folder and its access that we need to consider.
If by any chance a user is not provisioned correctly, errors of the following nature may pop up while trying to log in to Workspace. In this case, the user will not see "EXPLORE" in Workspace

"You do not have sufficient permission to login to your default folder or the folder no longer exists.  Please contact your administrator for assistance."

AND EVEN

Required application module cds.folderactions is not configured.
Object doesn't support property or method 'getSessionId'

This can be the cause of the user not being given proper access. It can be resolved by giving proper access to the ROOT folder.
Log in to Workspace as ADMIN
Click EXPLORE in the Menu bar.
Under Explore, right-click ROOT -> Edit Permission -> Choose who you want to give permission to and SAVE.


Wednesday, July 29, 2015

Smart View - Accessing Shared Connections from an XML File

Smart View - Accessing Shared Connections from an XML File

Connect only to Essbase through Smart View (no Planning or Reporting and Analysis to be seen under Shared Connection)

In this document, I will explain the process of connecting to only Essbase through the use of XML.

Starting 11.1.2.3, we can connect to Smart View data sources using Shared Connection from an XML file which can reside in the server or client computer. So, basically, we can create an XML file to point to all the products that we want to connect via Smart View, for example Essbase, Planning, Reporting and Analysis, Financial Management, etc.

As we know, when we connect to Smart View, we have Essbase, Planning, Reporting and Analysis, etc nodes in the Shared connection. In my work environment, however, the Managers want users to see only the Essbase node in the Shared connection box. They would not want users to see the Planning and Reporting and Analysis nodes in the connection pane.

We can take the following steps to achieve this. And basically, we can add other products if we want other products to be visible.

      Create an empty XML file. (Open a notepad and save it as XML. Give a meaningful name). Also make sure to save it in a meaningful location. In my case I have named the XML file “SmartView_Essbase_Connection.xml” and I have saved it at “C:\software_nirmal\SmartView_Connection”

      Add the following lines: The reason I have them colored are to show the opening and ending tags.
<?xml version="1.0" encoding="UTF-8"?>
<res_GetProvisionedDataSources>
<Product id="APS" name="APS-11.1.2" displayVersion="version">
<Server name="Oracle Hyperion Provider Services" context="http://My_Dev_AppServer:19000/aps/SmartView"></Server>
</Product>
</res_GetProvisionedDataSources>

Make sure that you have proper SERVERNAME, PORT etc for Server Name. Check Smart View guide and your system configuration, etc to check for those settings. This is for Essbase only. If you want to add other products, such as Planning, Reporting and Analysis, etc, you can add them – The “Product ID” and “Server name” part.
<Product id="APS" name="APS-11.1.2" displayVersion="version">
<Server name="Oracle Hyperion Provider Services" context="http://webServerHost:19000
or configured webServerPort number/aps/SmartView"></Server>
</Product>

Now that we have saved the XML file with the contents that we want, it is time to use the XML to Connect to Essbase through Smart View. In this example, we will have the XML file in local drive.
a.       Open MS Excel.
b.      Click the SmartView tab and under the SmartView ribbon, click Options.
c.       Under Advanced -> Shared Connection URL, make sure to type in the following: C:\software_nirmal\SmartView_Connection\SmartView_Essbase_Connection.xml (This is the path where XML file in located, followed by the XML file name.) 
d.      OK
e.      Panel -> Shared Connection
f.        Now you will see only Oracle Essbase.  

The syntax for each provider type is below.
Provider Services (Essbase)
<Product id="APS" name="APS-11.1.2" displayVersion="version">
<Server name="Oracle Hyperion Provider Services" context="http://webServerHost:19000
or configured webServerPort number/aps/SmartView"></Server>
</Product>
Planning
<Product id="HP" name="HP-11.1.2" displayVersion="version">
<Server name="Oracle Hyperion Planning, Fusion Edition" context="http://
Accessing Shared Connections from an XML File 23
webServerHost:19000 or configured webServerPort number/HyperionPlanning/SmartView"></
Server>
</Product>
Financial Management
<Product id="HFM" name="HFM-11.1.2" displayVersion="version">
<Server name="Oracle Hyperion Financial Management, Fusion Edition" context="http://
webServerHost:19000 or configured webServerPort number/hfmadf/../hfmofficeprovider/
HFMOfficeProvider.aspx"></Server>
</Product>
Reporting and Analysis
<Product id="RAFramework" name="RAFramework-11.1.2" displayVersion="version">
<Server name="Reporting and Analysis Framework" context="http://webServerHost:19000
or configured webServerPort number/raframework/browse/listXML"></Server>
</Product>
Strategic Finance
<Product providerType="ExtensionProvider" id="HSF" name="HSF-11.1.2"
displayVersion="version">
<Server name="Oracle Hyperion Strategic Planning, Fusion Edition"
context="webServerHost:8900 or configured webServerPort number/StrategicPlanning/
SmartView"></Server>
</Product>
Oracle BI EE
<Product providerType="ExtensionProvider" id="27EE9B0D-D5F5-42c9-AFC5-44FEA770C693"
name="OBI EE-11.1.1.7" displayVersion="version">
<Server name="Oracle BI, Fusion Edition" context="OBI:http://webServerHost:9704 or
configured webServerPort number/analytics/jbips"></Server>
</Product>


Monday, June 29, 2015

Life Cycle Management - migration from Version 11.1.2.1 to 11.1.2.3

Scenario –
You had to migrate  an artifact (say Shared Services security) from Version 11.1.2.1 to Version 11.1.2.3. Basically, the first thing that can strike your mind would be to use LCM to migrate the security. However, can the task be fulfilled simply via the use of LCM? Let’s see it.

Here we are migrating “Native Directory” from 11.1.2.1 to 11.1.2.3.

In the source environment (11.1.2.1), let us launch Shared Services.
In Shared Services, 

Application Management 
     Application Groups
               Foundation
                        Shared Services (Click it - and you will see the artifacts populate to the right)

Basically, you will see
     Native Directory
     Task Flows

Expand Native Directory and select just "Groups" - we are migrating only Groups for this exercise.

Click "Define Migration"
For Source Options in the next step, leave Default.
The next window is where we can type in the name of our choice for Destination. Let us give a name "Group_Export" and click Next.

Go through all the steps and click "Execute Migration" in the last step.

The Migration Status Report should have status as "Completed" in case the export is successful.

Refresh Shared Services, and expand the "File System" node and we will see "Group_Export" item under the File System.

Now, let's get in to the folder where the Export folder is populated after the process.
The path in my environment is "oracle\Middleware\user_projects\domains\EPMSystem\Server\epmsystem1\import_export\admin@Native Directory"

Here, I have a folder named "Group_Export" which was created during the LCM export process.

The folder "Group_Export" contains two other folders - "Info" and "Resources".
While the folder "Info" has two files - "listing.xml" and "sourceinfo.xml," "Resources" folder has a folder "Native Directory" which contains a file called "Groups.csv"

Now let us see how the LCM process works in the target environment (11.1.2.3 - in this case). Process is almost the same, however, we need to notice the differences in files that are created during the LCM process. 


In the target environment (11.1.2.3), let us launch Shared Services.
In Shared Services, 

Application Management 
     Application Groups
               Foundation
                        Shared Services (Click it - and you will see the artifacts populate to the right)


Basically, you will see
     Native Directory
     Task Flows


Drill down the Native Directory and select just "Groups" - we are migrating only Groups for this exercise.


Click "Export"
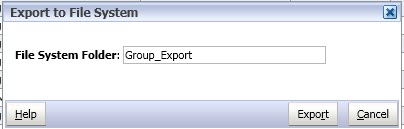
"Export to File System" box appears. Type in an appropriate name and click "Export." In this case, I will type in "Group_Export"

Check the Migration Status Report. The status would be "Completed" if it exports successfully.

Refresh Shared Services, and under "File System" you will notice "Group_Export" like in the following figure.


Now, let's go to the Import_Export folder (the repository for LCM files). In my environment, the path to the Import_Export folder is "oracle\Middleware\user_projects\domains\EPMSystem\Servername\epmsystem1\import_export" 
Make sure you know the path. 

As I dig in to the folder, I can see a .ZIP file named "Group_Export.zip" - here is where the difference lies.

You extract the .zip file and you will see a folder named "HSS-Shared Services" and two files "Export.xml" and "Import.xml" - This is where the main difference is in terms of the files that are created during LCM export using version 11.1.2.1 and 11.1.2.3.

However, if you dig deeper into the "Resources" folder and further down to the "Native Directory" folder, you have the file that you basically need - in this case, the "Groups.csv" file.

So at this point, all you need to do is
a. Copy the "Groups.csv" file from the source environment and paste it to the target environment in the "Native Directory" folder
b. Go to the "Group_Export" folder so it will have the following files under it
c. Zip the three files shown above and name it "Group_Export.zip."
d. Move the "Group_Export.zip" file under the "import_export" folder (the location where the file was created during the LCM export process in the beginning.

Now, you should be able to do a LCM import from the "File System" tree in the target Shared Services.


Thursday, June 25, 2015

Hyperion Shared Services - CES_PROCESS_DEF - maintenance release issue


I was in the process of upgrading the EPM System from Version 11.1.2.1 to 11.1.2.3 through maintenance release, and after the installation and configuration completed successfully, I noticed that I was not able to log in to Shared Services (or should we say pull up Shared Services – as we can now see Shared Services residing in the Workspace window in a different tab - as opposed to a different Window that we could see in  Version 11.1.2.1).

Every time I tried to get in to Shared Services, I would get the following error - 
 “Required application module cas.containers.tadpole is not configured.”

Upon checking the FoundationServices error logs @ user_projects\domains\EPMSystem\servers\FoundationServices0\logs, I could see 

DSF initialization error  ORA-00904: "PROCESSNAME": invalid identifier” which would suggest that it had to do with Oracle table or schema. 

The logs would suggest that It was pointing to "PROCESSNAME" column in the Shared Services oracle table.

Upon further research, I found out that, during maintenance release, some of the Shared Services tables were not updated during the maintenance release upgrade. 

For example, the table “CES_PROCESS_DEF”  has 4 columns in Version 11.1.2.1. However, in Version 11.1.2.3, it is supposed to have 9 columns. In fact, “PROCESSNAME” is one of the columns that would have to be added to the “CES_PROCESS_DEF”  table during the EPM maintenance release process (during upgrade process). However, the tables were not being modified.

In order to resolve the issue, I would have to add the missing columns, but, there could have been other columns missing as well. Upon doing some research and digging through the folders, I could find a bunch of SQL scripts in the Middleware\EPMSystem11R1\products\Foundation\server\conf” folder which would be used to resolve the issue. 

One such script in this case – since I have Oracle as my database – is
create_oracle_workflow_upgrade.sql” which basically adds tables/columns that might not have been added during the upgrade process.

From this I could figure out that it might have been a known issue where the tables would not be me modified during the maintenance release so these could be the scripts that Oracle might have created in order to resolve such issues. But that is just my guess. 

Feel free to open the script and run only the ones that are required to resolve the issue. In my case, I had to run only two of the lines in the script.

After stopping the services, I ran the script
“ALTER TABLE ces_process_def ADD (applicationname Varchar(100), processname Varchar(100), revision Varchar(100), authorname Varchar(100),description Varchar(100))” from within the main script which added the columns that were missing.
I verified the addition of the columns, started the services, and I was able to get into Shared Services.

Check you Shared Services table in case you experience the same issue during upgrades.


Thursday, April 16, 2015

The Hyperion inconsistency

The Planning Utilities that we have available in the Planning1 folder (\oracle\Middleware\user_projects\epmsystem2\Planning\planning1 in Version 11.1.2.1 for example) are simply wonderful in terms of doing several activities in a fly - for example Loading and modifying the outline, exporting and importing user security, encrypting password, et. al. They are very easy to use and simple in terms of syntax.
The only comment I have are the inconsistencies on how you write the script.
Say for example that you want to migrate "SECURITY" by using the Utility. In this case, you would export the Security and then import it by using "ExportSecurity" and "ImportSecurity" utilities respectively.

The syntax for ExportSecurity in the simplest case would be something like:
ExportSecurity.cmd /A=application_name,/U=admin_user

The above script would export the application security and generate a SECFILE.TXT file.

Now, if you would import the security in the target application, the syntax you would probably think of is:
ImportSecurity.cmd /A=application_name,/U=admin_user
Right?

However, the syntax for ImportSecurity is:
ImportSecurity.cmd "application_name,admin_user"

It is pretty basic, however, what if they had the same kind of syntax for both of those utilities. Oracle or Hyperion might have some reasons behind it, but sometimes I am puzzled about how or why these things have such inconsistencies.

Any comments would be fun for discussion purposes or as a feedback to Oracle.

Thursday, February 19, 2015

Want to find oPatch inventory?


If you want to find out the list of oPatches that have already been installed to your EPM environment, you can take the following steps:

Open a command prompt.

Get in to the oPatch folder - ie, change directory to "D:\oracle\Middleware\EPMSystem11R1\OPatch" or wherever you have oPatch folder.

Run the following script:
opatch.bat lsinventory -oh D:\Oracle\Middleware\EPMSystem11R1 -jre D:\Oracle\Middleware\jdk160_21

Make sure to replace the path with the one you have in your environment.

You will see a list of patches that are already applied to your environment.


Friday, April 18, 2014

Essbase Quick Reference

Essbase: Extended Spreadsheet - a multi-dimensional OLAP system.

Essbase database structure:
   Application
       Database
           Outline
Outline is created when database is created. Includes dimensions, members, aliases, properties, types, consolidation, and mathematical operators.

Following files are created when a database is created.
.db, .dbb, .otl, .esm, .tct

Following files are created when an application is created.
.instance, .app, .log


Intelligent Calculation: With this, Essbas calculates only update members and their dependent parents (dirty blocks) making calculation efficient. After full calculation, all data blocks are marked clean. We can turn the Intelligent Calculation feature on or off through calculation script or essbase.cfg file.

Keyword - UPDATECALC

Syntax (calc script) - SET UPDATECALC ON/OFF;
Syntax (essbase.cfg file) - UPDATECALC TRUE/FALSE

SET UPDATECALC ON;      Calculates only dirty blocks
SET UPDATE CALC OFF;    Calculates all data blocks


Essbase Security File - essbase.sec
Location - Arborpath/bin directory - eg: (\\EssbaseServer\d$\Hyperion\Essbase\bin)

Information stored in secfile:
  • Filter Access
  • Application Access type
  • Application and database properties, substitution variables
  • CalcScript access
essbase.sec file contents are encrypted. We can export it to a .TXT file and view the contents.
MAXL to export "essbase.sec" file:
  • export security_file to data_file "e:\khoonks\essbase_security_file.txt"


Thursday, April 17, 2014

Adding Items to Windows 7 Taskbar the hard way

Some programs/items are easy to be added to the Windows Taskbar for easy access – provided you see the “Pin To Taskbar” option on right-click. How about adding the item which does not have the option “Pin To Taskbar” when you right-click the item. You can add the item on the Taskbar the “hard way” so that you can access/open the program without having to browse through the file path.


In this example, I will show you how to add the EssbaseAdministration Console (EAS) desktop client to the Taskbar.
In the following illustration, we do not have “Pin To Taskbar” when we right-click the EAS icon. So I will go through the process of adding it to the Taskbar. We can do it with any other file in the same way.


I have this file ADMINICON.BAT on my desktop which is a shortcut of EAS. As I have mentioned above, there is no “Pin To Taskbar” option on right-click, nor can I “drag it to the Taskbar and drop it” – well this is another easy way of adding an item to a task bar.
What I can do now, however, is
  • copy ADMINICON.BAT (Ctrl-C)
  • Create a new folder with a descriptive name anywhere you would not happen to delete. In my example, I have created a folder named “eas_taskbar_shortcut” under the path “C:\Users\nshrestha\Desktop\nirmal”
  • Paste the item you have copied (Ctrl-V) to the folder you just created.
Now, you should have ADMINICON.BAT file in your new folder.
  • Right-click and COPY


  • Right-click anywhere in a blank area within the folder (other than the ADMINICON.BAT file) -> New -> Shortcut


  • The “Create Shortcut” pop-up window appears.
  • Paste (Ctrl-V) in the space that says “Type the location of the item”


Important: Move the cursor all the way at the beginning of the path and type in “explorer and a space” so that it looks something like the one below:


Next
Type in a suitable name. In my case I have named it EAS_Shortcut.


Finish.

Right-click the brand-new item “EAS Shortcut” just created, and you will see the “Pin to Taskbar” option upon right-clicking it. You can also now see the “Pin to Start Menu” if you want to add it to the Start Menu. You can even drag the item to the task bar or Start Menu.


Tuesday, April 1, 2014

Rolling back an EPM oPatch

Oracle EPM oPatches or simply oPathes are supposed to fix bugs or issues. So, for example, if there are any defects in your existing version of EPM, Oracle suggests you apply certain patch so that the issue will be resolved. However, not all issues are guaranteed to be resolved, and while fixing some, it you may come up with new issues. For example, we recently applied the EPM 600 patch (Planning patch 14464109) which was supposed to fix the Internet Explorer 9 - related issue that we faced with EPM 11.1.2.1. This patch has a lot of pre-requisite patches, one of which is the patch 13904635. Therefore, we applied all the pre-requisite patches including the 13904635 and ultimately the main 14464109 patch. The IE9 related issue was fixed, however, the overall process damaged something else.

We had a Business Rules issue after the application of the patch where we would get an error every time we clicked "Business Rules" in EAS. The error message was 
"org/apache/xerces/parsers/DOMParser"

After some research, we found out that the patch 13904635 was the culprit. We decided to get patch 13904635 rolled back, so we went through the Rollback section of the README.

The following is the rollback syntax that is provided in the README
opatch.bat rollback –id 13904635 -oh D:\Oracle\Middleware\EPMSystem11R1 -jre D:\Oracle\Middleware/jdk160_21.

So, I opened the command prompt, got in to the oPatch folder and ran the script, however, I got a syntax error.
After putting up the question in Oracle Forum, one of the Aces - Celvin suggested me type in 

opatch.bat rollback -id 13904635 -oh D:\Oracle\Middleware\EPMSystem11R1 -jdk D:\Oracle\Middleware\jdk160_21

and it worked perfectly for me

The syntax looks exactly the same except for one slight difference "jdk" and "jre" and the "\". JRE works, as suggested by experts and so do JDK in this case. However, JDK worked for me.

So if someone is trying roll back a patch, make sure to try different syntax instead of just sticking with Oracle's README. I am not sure why, but they have some significant TYPOS that can get you nuts.


Tuesday, March 25, 2014

Essbase data load Rules file - how to create

In Essbase, we use rules to map data values to an Essbase database or map dimensions and members to Essbase outline. Rules are stored in rules files and have extension .RUL.
We use Rules Files to define which build method to use during dimension build, how to transform data values before loading them as the source file may not exactly be in the format Essbase understands, what to load and what to avoid loading, etc.

This is what the Rules Files branch would look like in EAS Enterprise View.


We can follow the following process to build Rules files to load data in Essbase. We can use Rules to build dimension as well. The process of creating Rules files to load data and build dimension are almost the same except for some differences in the process.
In the picture of EAS enterprise view illustrated above, we already see the Rules Files branch. In this case we can simply right-click on the “Rules Files” and -> “Create Rules File”


In case, it is the first time we are creating a Rules File or if we do not see the Rules Files branch in the Enterprise View, we can use the “File -> Editors -> Data Prep Editor” option to open up the Data Prep Editor.


This is what the Data Prep Editor looks like


File -> Open Data File
Open the data file that you want to load or a sample file that is a replication of the load file.
In this example, I have chosen a .TXT file named “sample_load_file.txt” that I have on my desktop.

This is what it looks like. The top section is RAW data whereas as the bottom section has everything in Field1. So, we will work on this file so that we can create a Rule that tells Essbase what and how to load the data.


One very important thing here in creating the Rules file is that if we look at the bottom section of the above illustration, we can see that Row1 is blank, and Row2 has the heading. Therefore, we want to tell Essbase to load data only starting Row3, and it can be achieved by skipping the first two lines during data load.
Click “Options -> Data Source Properties


Under Delimiter, choose the RADIO-BUTTON for Custom and enter the Pipe Symbol.


Click the “Header” tab.
Make sure “Number of lines to skip” is set to “2.” OK


This is what we will see now.


During the Rules file creation process, we can choose to “show” or “hide” the RAW data. So, this step is optional. If you want to hide RAW data – View -> Raw Data.


Since we are creating Rules file to load data, make sure to click the “Data Load Fields” icon.


Associate Outline: Options -> Associate Outline


Choose the outline with which the Rules is to be associated with.
Assigning Field Properties: This is where we define which field corresponds to what dimension.
Highlight Field1, and “Field -> Properties”


Click the “Data Load Properties” tab.


Double click “Versions” as the first column is “Versions” dimension. This is what it looks like.


Next -> “Scenarios”
Next -> “Center”
Follow this process to define the Fields.
When it comes to the fields that correspond to Jan, Feb, Mar, etc, we can expand the “Time Periods” dimension and choose the right members to correspond to the months.


After defining the last field, we can click OK to have those field properties set.
Now, Options -> Data Load Settings.


Under “Data Values” we can choose to “Overwrite existing values” or “Add to existing values” or “Subtract from existing values” – whatever we would like to do. In this case, we will choose the “Overwrite existing values” option. OK


Now, let us validate the Rule to ensure it does not have any error.
Options -> Validate


The follow pop-up notifies that there are no errors.


Now we can save the Rules file.
File -> Save
Essbase gives the option of saving the file either in the Essbase server or File System.
Make sure the .RUL files is not more than 8 letters long.
Save the .RUL file as per organization guidelines or whatever makes sense.

Now that we have created the data load RULES file, we can use this file each time we want to load similar type of data to the database.
To learn more about loading data to Essbase cube using Rules file, you can visit my blog about Essbase Data Load 
You can also visit Oracle's Rules files page to learn more about Rules Files.