Tuesday, December 22, 2015

How to run a batch script from Workspace

In order to run a batch job through Workspace, we can take the following steps:

In this example, I am going over the steps in creating a job which when runs the ExportSecurity batch job (that I have created for a specific application) from the Workspace.


The “Generic Job Application” tab opens.
Right-click anywhere and choose “Create New Generic Application” OR click the “+” sign.
The following “Create New Generic Application” window pops up.


Provide a suitable “Product Name” like in the following screenshot. In my example, I have given a name “Export_Security_From_Workspace”
Choose a Product Host, which is the Server where Workspace is Configured.
We can “Click a button to insert a Command Template value.” In this case (it being a Windows batch job), we can select “$PROGRAM” and “$PARAMS” – Note: Please refer to “Reporting and Analysis Frameword Admin guide” for more information on this.
For the Executable we can specify the “CMD.EXE” file - %WINDIR%\System32\cmd.exe


Click OK

Now the steps to import the batch file.
In this example, I am in the “Testing” folder in Workspace.
Import “File As a job”


The following windows pops up.


Provide the file, a name and description (optional), and check “Import as Generic Job” like in the following screenshot.


Click Next. The following screen pops up. Choose the job we created in the beginning of the tutorial.


Based on requirement or the work environment, we can choose “Run Options” “Parameters” “Credentials” etc. However, it can be finished at this point by clicking the “Finish” tab.
Now, we can see the job in the folder “Testing” in the Workspace.


We can now run the job by double-clicking or by right-clicking.


The following windows appears where we can specify the output.


Click “Run”


When the job completes, we can see the security file being populated.


Check the “Testing” folder again and we now have the OUTFILE as well where resides the “SECFILE.TXT” 

Wednesday, August 12, 2015

Accessing the Hyperion Workspace Explore folder

When it comes to browsing through the folders in Hyperion Workspace, we have the Explore folder and its access that we need to consider.
If by any chance a user is not provisioned correctly, errors of the following nature may pop up while trying to log in to Workspace. In this case, the user will not see "EXPLORE" in Workspace

"You do not have sufficient permission to login to your default folder or the folder no longer exists.  Please contact your administrator for assistance."

AND EVEN

Required application module cds.folderactions is not configured.
Object doesn't support property or method 'getSessionId'

This can be the cause of the user not being given proper access. It can be resolved by giving proper access to the ROOT folder.
Log in to Workspace as ADMIN
Click EXPLORE in the Menu bar.
Under Explore, right-click ROOT -> Edit Permission -> Choose who you want to give permission to and SAVE.


Wednesday, July 29, 2015

Smart View - Accessing Shared Connections from an XML File

Smart View - Accessing Shared Connections from an XML File

Connect only to Essbase through Smart View (no Planning or Reporting and Analysis to be seen under Shared Connection)

In this document, I will explain the process of connecting to only Essbase through the use of XML.

Starting 11.1.2.3, we can connect to Smart View data sources using Shared Connection from an XML file which can reside in the server or client computer. So, basically, we can create an XML file to point to all the products that we want to connect via Smart View, for example Essbase, Planning, Reporting and Analysis, Financial Management, etc.

As we know, when we connect to Smart View, we have Essbase, Planning, Reporting and Analysis, etc nodes in the Shared connection. In my work environment, however, the Managers want users to see only the Essbase node in the Shared connection box. They would not want users to see the Planning and Reporting and Analysis nodes in the connection pane.

We can take the following steps to achieve this. And basically, we can add other products if we want other products to be visible.

      Create an empty XML file. (Open a notepad and save it as XML. Give a meaningful name). Also make sure to save it in a meaningful location. In my case I have named the XML file “SmartView_Essbase_Connection.xml” and I have saved it at “C:\software_nirmal\SmartView_Connection”

      Add the following lines: The reason I have them colored are to show the opening and ending tags.
<?xml version="1.0" encoding="UTF-8"?>
<res_GetProvisionedDataSources>
<Product id="APS" name="APS-11.1.2" displayVersion="version">
<Server name="Oracle Hyperion Provider Services" context="http://My_Dev_AppServer:19000/aps/SmartView"></Server>
</Product>
</res_GetProvisionedDataSources>

Make sure that you have proper SERVERNAME, PORT etc for Server Name. Check Smart View guide and your system configuration, etc to check for those settings. This is for Essbase only. If you want to add other products, such as Planning, Reporting and Analysis, etc, you can add them – The “Product ID” and “Server name” part.
<Product id="APS" name="APS-11.1.2" displayVersion="version">
<Server name="Oracle Hyperion Provider Services" context="http://webServerHost:19000
or configured webServerPort number/aps/SmartView"></Server>
</Product>

Now that we have saved the XML file with the contents that we want, it is time to use the XML to Connect to Essbase through Smart View. In this example, we will have the XML file in local drive.
a.       Open MS Excel.
b.      Click the SmartView tab and under the SmartView ribbon, click Options.
c.       Under Advanced -> Shared Connection URL, make sure to type in the following: C:\software_nirmal\SmartView_Connection\SmartView_Essbase_Connection.xml (This is the path where XML file in located, followed by the XML file name.) 
d.      OK
e.      Panel -> Shared Connection
f.        Now you will see only Oracle Essbase.  

The syntax for each provider type is below.
Provider Services (Essbase)
<Product id="APS" name="APS-11.1.2" displayVersion="version">
<Server name="Oracle Hyperion Provider Services" context="http://webServerHost:19000
or configured webServerPort number/aps/SmartView"></Server>
</Product>
Planning
<Product id="HP" name="HP-11.1.2" displayVersion="version">
<Server name="Oracle Hyperion Planning, Fusion Edition" context="http://
Accessing Shared Connections from an XML File 23
webServerHost:19000 or configured webServerPort number/HyperionPlanning/SmartView"></
Server>
</Product>
Financial Management
<Product id="HFM" name="HFM-11.1.2" displayVersion="version">
<Server name="Oracle Hyperion Financial Management, Fusion Edition" context="http://
webServerHost:19000 or configured webServerPort number/hfmadf/../hfmofficeprovider/
HFMOfficeProvider.aspx"></Server>
</Product>
Reporting and Analysis
<Product id="RAFramework" name="RAFramework-11.1.2" displayVersion="version">
<Server name="Reporting and Analysis Framework" context="http://webServerHost:19000
or configured webServerPort number/raframework/browse/listXML"></Server>
</Product>
Strategic Finance
<Product providerType="ExtensionProvider" id="HSF" name="HSF-11.1.2"
displayVersion="version">
<Server name="Oracle Hyperion Strategic Planning, Fusion Edition"
context="webServerHost:8900 or configured webServerPort number/StrategicPlanning/
SmartView"></Server>
</Product>
Oracle BI EE
<Product providerType="ExtensionProvider" id="27EE9B0D-D5F5-42c9-AFC5-44FEA770C693"
name="OBI EE-11.1.1.7" displayVersion="version">
<Server name="Oracle BI, Fusion Edition" context="OBI:http://webServerHost:9704 or
configured webServerPort number/analytics/jbips"></Server>
</Product>


Monday, June 29, 2015

Life Cycle Management - migration from Version 11.1.2.1 to 11.1.2.3

Scenario –
You had to migrate  an artifact (say Shared Services security) from Version 11.1.2.1 to Version 11.1.2.3. Basically, the first thing that can strike your mind would be to use LCM to migrate the security. However, can the task be fulfilled simply via the use of LCM? Let’s see it.

Here we are migrating “Native Directory” from 11.1.2.1 to 11.1.2.3.

In the source environment (11.1.2.1), let us launch Shared Services.
In Shared Services, 

Application Management 
     Application Groups
               Foundation
                        Shared Services (Click it - and you will see the artifacts populate to the right)

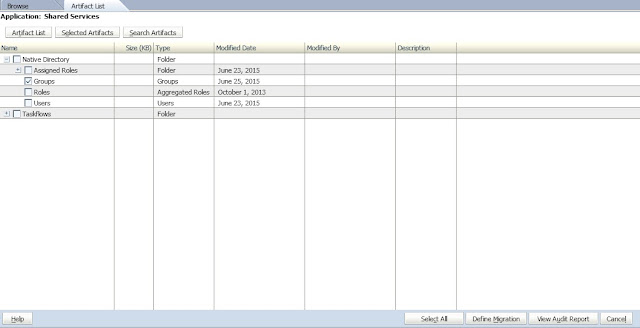
Basically, you will see
     Native Directory
     Task Flows

Expand Native Directory and select just "Groups" - we are migrating only Groups for this exercise.

Click "Define Migration"
For Source Options in the next step, leave Default.
The next window is where we can type in the name of our choice for Destination. Let us give a name "Group_Export" and click Next.

Go through all the steps and click "Execute Migration" in the last step.

The Migration Status Report should have status as "Completed" in case the export is successful.

Refresh Shared Services, and expand the "File System" node and we will see "Group_Export" item under the File System.

Now, let's get in to the folder where the Export folder is populated after the process.
The path in my environment is "oracle\Middleware\user_projects\domains\EPMSystem\Server\epmsystem1\import_export\admin@Native Directory"

Here, I have a folder named "Group_Export" which was created during the LCM export process.

The folder "Group_Export" contains two other folders - "Info" and "Resources".
While the folder "Info" has two files - "listing.xml" and "sourceinfo.xml," "Resources" folder has a folder "Native Directory" which contains a file called "Groups.csv"

Now let us see how the LCM process works in the target environment (11.1.2.3 - in this case). Process is almost the same, however, we need to notice the differences in files that are created during the LCM process. 


In the target environment (11.1.2.3), let us launch Shared Services.
In Shared Services, 

Application Management 
     Application Groups
               Foundation
                        Shared Services (Click it - and you will see the artifacts populate to the right)


Basically, you will see
     Native Directory
     Task Flows


Drill down the Native Directory and select just "Groups" - we are migrating only Groups for this exercise.


Click "Export"
"Export to File System" box appears. Type in an appropriate name and click "Export." In this case, I will type in "Group_Export"

Check the Migration Status Report. The status would be "Completed" if it exports successfully.

Refresh Shared Services, and under "File System" you will notice "Group_Export" like in the following figure.


Now, let's go to the Import_Export folder (the repository for LCM files). In my environment, the path to the Import_Export folder is "oracle\Middleware\user_projects\domains\EPMSystem\Servername\epmsystem1\import_export" 
Make sure you know the path. 

As I dig in to the folder, I can see a .ZIP file named "Group_Export.zip" - here is where the difference lies.

You extract the .zip file and you will see a folder named "HSS-Shared Services" and two files "Export.xml" and "Import.xml" - This is where the main difference is in terms of the files that are created during LCM export using version 11.1.2.1 and 11.1.2.3.

However, if you dig deeper into the "Resources" folder and further down to the "Native Directory" folder, you have the file that you basically need - in this case, the "Groups.csv" file.

So at this point, all you need to do is
a. Copy the "Groups.csv" file from the source environment and paste it to the target environment in the "Native Directory" folder
b. Go to the "Group_Export" folder so it will have the following files under it
c. Zip the three files shown above and name it "Group_Export.zip."
d. Move the "Group_Export.zip" file under the "import_export" folder (the location where the file was created during the LCM export process in the beginning.

Now, you should be able to do a LCM import from the "File System" tree in the target Shared Services.


Thursday, June 25, 2015

Hyperion Shared Services - CES_PROCESS_DEF - maintenance release issue


I was in the process of upgrading the EPM System from Version 11.1.2.1 to 11.1.2.3 through maintenance release, and after the installation and configuration completed successfully, I noticed that I was not able to log in to Shared Services (or should we say pull up Shared Services – as we can now see Shared Services residing in the Workspace window in a different tab - as opposed to a different Window that we could see in  Version 11.1.2.1).

Every time I tried to get in to Shared Services, I would get the following error - 
 “Required application module cas.containers.tadpole is not configured.”

Upon checking the FoundationServices error logs @ user_projects\domains\EPMSystem\servers\FoundationServices0\logs, I could see 

DSF initialization error  ORA-00904: "PROCESSNAME": invalid identifier” which would suggest that it had to do with Oracle table or schema. 

The logs would suggest that It was pointing to "PROCESSNAME" column in the Shared Services oracle table.

Upon further research, I found out that, during maintenance release, some of the Shared Services tables were not updated during the maintenance release upgrade. 

For example, the table “CES_PROCESS_DEF”  has 4 columns in Version 11.1.2.1. However, in Version 11.1.2.3, it is supposed to have 9 columns. In fact, “PROCESSNAME” is one of the columns that would have to be added to the “CES_PROCESS_DEF”  table during the EPM maintenance release process (during upgrade process). However, the tables were not being modified.

In order to resolve the issue, I would have to add the missing columns, but, there could have been other columns missing as well. Upon doing some research and digging through the folders, I could find a bunch of SQL scripts in the Middleware\EPMSystem11R1\products\Foundation\server\conf” folder which would be used to resolve the issue. 

One such script in this case – since I have Oracle as my database – is
create_oracle_workflow_upgrade.sql” which basically adds tables/columns that might not have been added during the upgrade process.

From this I could figure out that it might have been a known issue where the tables would not be me modified during the maintenance release so these could be the scripts that Oracle might have created in order to resolve such issues. But that is just my guess. 

Feel free to open the script and run only the ones that are required to resolve the issue. In my case, I had to run only two of the lines in the script.

After stopping the services, I ran the script
“ALTER TABLE ces_process_def ADD (applicationname Varchar(100), processname Varchar(100), revision Varchar(100), authorname Varchar(100),description Varchar(100))” from within the main script which added the columns that were missing.
I verified the addition of the columns, started the services, and I was able to get into Shared Services.

Check you Shared Services table in case you experience the same issue during upgrades.


Thursday, April 16, 2015

The Hyperion inconsistency

The Planning Utilities that we have available in the Planning1 folder (\oracle\Middleware\user_projects\epmsystem2\Planning\planning1 in Version 11.1.2.1 for example) are simply wonderful in terms of doing several activities in a fly - for example Loading and modifying the outline, exporting and importing user security, encrypting password, et. al. They are very easy to use and simple in terms of syntax.
The only comment I have are the inconsistencies on how you write the script.
Say for example that you want to migrate "SECURITY" by using the Utility. In this case, you would export the Security and then import it by using "ExportSecurity" and "ImportSecurity" utilities respectively.

The syntax for ExportSecurity in the simplest case would be something like:
ExportSecurity.cmd /A=application_name,/U=admin_user

The above script would export the application security and generate a SECFILE.TXT file.

Now, if you would import the security in the target application, the syntax you would probably think of is:
ImportSecurity.cmd /A=application_name,/U=admin_user
Right?

However, the syntax for ImportSecurity is:
ImportSecurity.cmd "application_name,admin_user"

It is pretty basic, however, what if they had the same kind of syntax for both of those utilities. Oracle or Hyperion might have some reasons behind it, but sometimes I am puzzled about how or why these things have such inconsistencies.

Any comments would be fun for discussion purposes or as a feedback to Oracle.

Thursday, February 19, 2015

Want to find oPatch inventory?


If you want to find out the list of oPatches that have already been installed to your EPM environment, you can take the following steps:

Open a command prompt.

Get in to the oPatch folder - ie, change directory to "D:\oracle\Middleware\EPMSystem11R1\OPatch" or wherever you have oPatch folder.

Run the following script:
opatch.bat lsinventory -oh D:\Oracle\Middleware\EPMSystem11R1 -jre D:\Oracle\Middleware\jdk160_21

Make sure to replace the path with the one you have in your environment.

You will see a list of patches that are already applied to your environment.